Friday, May 30, 2014

Algorithms astray


I don't buy much stuff online so the omniscient algorithmers have a hard time figuring out what kind of ads to pop up for me.  So on the rare occasions when I do visit a retail site, they sure do glom onto it and smack me in the face.  For example, when I wrote about my failures as a Kentucky Derby fashion plate, I grabbed a photo of some doodads for your shoes from a website to illustrate the blog post.  Ever since I have been seeing ads for that company's products.  Little do they know that every time I see their ad I give thanks that I'm not in the market for that kind of junk.  (My solution for preventing your spike heels from sinking into the grass?  Don't wear spike heels to grassy places.)

Earlier in the year we went to New Orleans on an ill-fated vacation (the paralyzing ice storm arrived just about the same time we did) and for weeks and weeks I kept seeing ads for the hotel where we had stayed.  Apparently they think we had such a fine time that we're going to go back, again and again.

But here's the latest -- the day before we were about to leave on our trip-of-a-lifetime to the tiny islands around Britain and Ireland, here's what I found on my morning sudoku.

Apparently the algorithmers noted that I had visited the travel company's website to get a link to our itinerary, which I wanted to send to my family.

This was an ad for the same cruise that we were already booked on! Maybe they thought we would be likely to book a second stateroom on the same ship, so we wouldn't have quite so much togetherness.  Nice try.


Thursday, May 29, 2014

Sign of the week


You can probably guess where this sign would be found.


Wednesday, May 28, 2014

Quiltmaking 101 -- free-motion designs


With any kind of quilt, you can choose to have your free-motion quilting follow the lines and shapes of the design, or have a life of its own and be "drawn" over the entire quilt surface.  In some patterns like rail fence or log cabin, where the shapes are all more or less rectangular, you might want to use a quilting design where you start at one end of a shape and work across to the other end.  You can also work rows of these designs over the top of more complex compositions.

Here are some free-motion designs that fit that description:

Simple zigzag

Simple up and down -- with square corners or with curved ends

New Zealand -- named because it's a series of N and Z shapes

Curvy Y 

Nested H

Yin-yang circles

Greek key designs -- simple or more complicated.  Plan out your measurements if you want the key or maze to be perfectly regular, or just do it freehand.

Clamshells -- work a line of Us across the strip.  Turn and come back in the other direction beneath the first row, touching the top of each U to the curved bottom of the one above it.  Or do upside-down Us and work the next row above the first one.

Seashells -- starting at a corner, stitch a half-inch or so in along the bottom of your strip, then curve back to make the smallest inside curve; echo that curve back and forth to make two or three wraps.

 Several of these designs can be easily stitched holding your strip either horizontally or vertically.  I always sew yin-yang circles from top to bottom because I think my circles are rounder and it's easier to place the interior S curve along the center line when I'm looking at them from that direction.  But many of the other designs seem to flow more easily when the strip is horizontal.  Try both ways and see which way is most comfortable to your brain.

To stitch a horizontal row, it's better to start at the left and work toward the right, for two reasons.  First, because we write from left to right and the brain seems to work a bit better when the design unfolds in that direction.  But most important, when you quilt from left to right you're guiding the quilt package away from the harp of the sewing machine, into the wide open spaces to the left of your machine.  By contrast, if you start at the right, you'll have to force more and more fabric into the cramped space under the harp, and you'll have to reposition your right hand frequently to keep it from running into the harp.


Tuesday, May 27, 2014

Quiltmaking 101 -- free-motion quilting


If you've never tried free-motion quilting, it will be quite an experience.  The important word is "free" -- you can stitch any kind of design that you can draw.  And in fact, many have described free-motion quilting as drawing with a needle.  The only difference is that the "pencil" stays in one place, and you have to move the "paper" underneath it, instead of vice versa.  With a bit of practice you can make beautiful swoopy curves, elaborate straight-line maze designs, cursive writing, and of course, drawing.

Here are some key elements to learn about free-motion quilting:

Start off on the right foot.  This part is non-negotiable: you need a special presser foot, not your regular one.  You want the presser foot to press on the fabric while the stitch is being made, to keep the thread tension right and keep the fabric under control.  But the instant the needle emerges from the fabric, having made a stitch, you want the pressure to ease up so you can move the quilt to its new position.  In effect, you want the presser foot to jump up and down with each stitch: up when the needle is up, down when the needle is down.

Such a foot may be called a darning foot, a free-motion foot or a big foot.  It may be a closed circle or a part circle with an open space facing you.  I like an open foot, because I can better see what I'm doing, and because it's easier to change threads.  But you may like one of the other models better.  Start with the one that came with your machine and see if you can learn to love it before spending a lot of money on a new kind.

How about them dogs!  Most free-motion quilters like to drop the feed dogs, those little toothed rails on the bed of your sewing machine that ordinarily pull the fabric evenly under the needle.  You don't want the machine trying to sew a straight line when you want it to do something else.  There's probably a button or lever somewhere on your machine to make the feed dogs slip down below the level of your needle plate.  If you have a very old, basic machine you may want to tape a piece of index card over the feed dogs to prevent them from pulling on the fabric, with a hole in the middle for the needle.

On the other hand, some quilters like to keep the feed dogs up to put a little more tension on the quilt sandwich and keep it from slipping around.  They may compensate by reducing the pressure on the presser foot.  Experiment with both approaches and see which one works best for you.

Overcome gravity and inertia.  Your biggest enemy in free-motion quilting is the quilt itself, which is big and heavy and unwieldy.  You want the quilt to move under the needle only because you are guiding it.  But if gravity is pulling the quilt off the edge of your table, or if the weight of the quilt is resisting as you try to move it, your stitching line will have jogs and glitches.

You want to have the entire quilt supported, with enough slack that you can easily push and pull it under the needle.  So pile the quilt around the needle, making sure none of it hangs off the table.  For a larger quilt, you may want to move a card table or chair alongside your sewing machine to help hold the quilt.

Start in the middle.  Because the layers of the quilt sandwich aren't yet held together securely, they are liable to stray, even if you have basted or pinned.  The quilter's equivalent of painting yourself into a corner occurs when you quilt toward an area already quilted, and when you get there -- oops! -- there's more fabric on the backing than on the top, or vice versa.  Then you get a pleat or wrinkle on the back or a bulge on the front.  To prevent that kind of unpleasant surprise, you always want to work from an already-quilted area into an empty area.  In general, start in the center of the quilt and work outward.

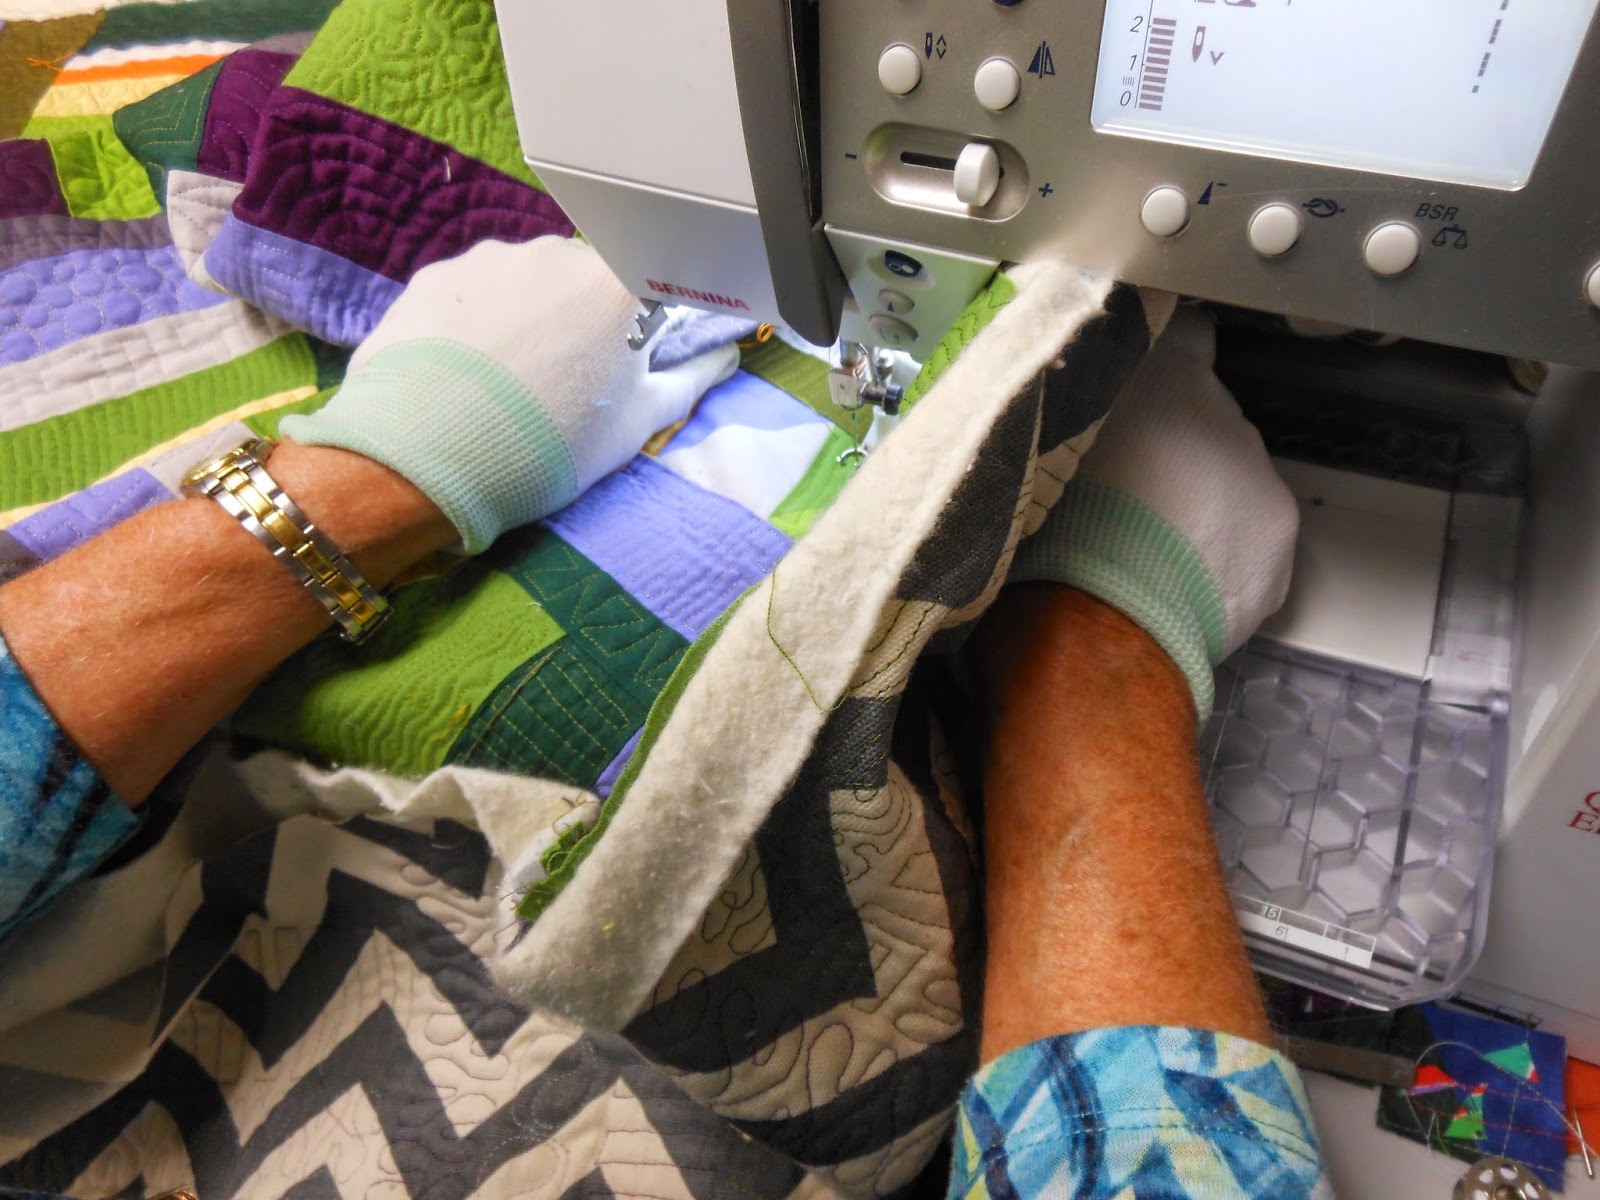
Get a grip!  You need a good grip on your fabric to move it under the needle, and to prevent it from moving of its own volition.  The classic grip is to spread both your hands around the sewing area, pressing down with your fingertips as you slide the quilt this way and that.  I like this grip, but it has drawbacks.  I find it puts way too much stress on my wrists, especially with a larger, heavier quilt, because I need to press down too hard to control the fabric.

So I often use alternate grips, grabbing a wad or roll of the quilt between thumb and fingers.


The classic grip: both hands spread on top


Alternate grip: grab a wad of quilt in one hand, spread the other


Alternate grip: grab a fold of the quilt from underneath

No matter how you grab the fabric, life will be better if you use some kind of rubber glove to enhance your grip.

On the left, quilting gloves; on the right, knit gloves with finger grips.

I got rhythm.  Free-motion quilting goes much better when you're in a rhythm.  Whenever you stop, that rhythm is broken and it's tricky to get back in the groove.  Unfortunately, you can't sew forever without stopping; pretty soon you're going to have to reposition your hands before they bump into the harp of the sewing machine or go under the needle.  So when you know you have to stop, choose your stopping place carefully.  Don't stop in the middle of a curve; stop at a corner or the most abrupt place on the curve.

Have the needle down when you stop, so the quilt doesn't accidentally move out of position while you're shifting hands, repositioning the bulk of the quilt or getting up to go to the bathroom.  If your machine doesn't have an automatic needle-down setting, get into the habit of putting the needle down by hand or by foot (depending on your machine) whenever you stop.

Stop and press.  I like to press my quilt several times during the quilting.  This is especially helpful at the beginning of the process, when there's a lot of loose material crammed under the harp of your sewing machine, and if you're gripping the quilt in a wad.  The quilt quickly gets limp and wrinkled from all this handling, and it's much nicer to work on a newly pressed area.  Pressing also gives you a little break from the sewing machine, for which your neck and shoulders will thank you.

Each time you stop and press, check the back of the piece to make sure you haven't inadvertently sewed in any pleats or wrinkles, and make sure all layers are smooth in the new area.

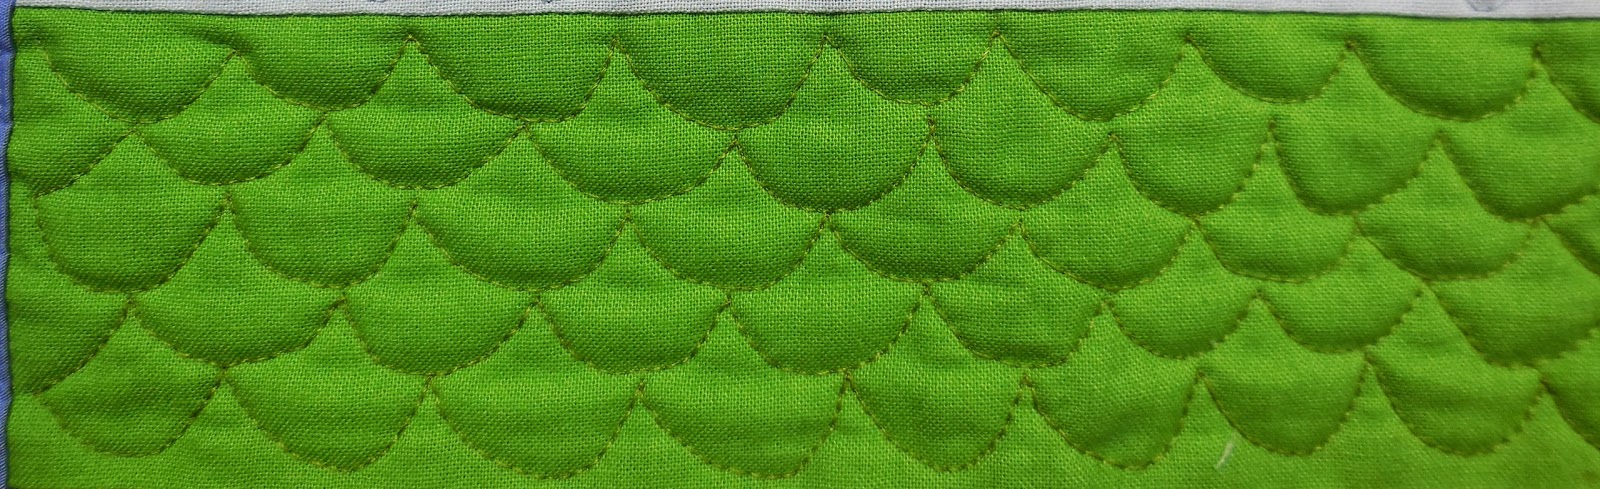
Practice, practice, practice.  It's a good idea to practice your quilting pattern in advance so you can work in a rhythm rather than having to worry about where to go next.  So get some paper and practice drawing a design without lifting the pencil from the paper.  If you see a quilting design in a book that intrigues you, practice drawing it for five minutes on paper, then practice sewing it on a test sample for a few minutes before you start on your quilt.  These practice minutes will seem like hours, because you're eager to get on with the job, but they will pay off.  When you finally get to the quilt, the design will feel natural and you can sew without agonizing over each turn.

Pedal to the metal.  It's important to keep up your machine speed when free-motion quilting.  It may seem counterintuitive, but you have better control when the needle is moving quickly.  And it's easier to maintain your rhythm if you keep going at the same speed.  When I'm quilting for long periods of time, I tend to gradually ease off on the pedal and have to remind myself to speed up.

Before we move on, let's talk about the 800-pound gorilla: the automatic stitch regulator feature found on some high-end sewing machines.  This feature uses a laser beam to inspect your fabric and detect how far you have moved it since the last stitch.  When you have moved it exactly so far, the mechanism sends the needle down for the next stitch.  In theory, this means you will have perfectly even stitches no matter how tentatively or jerkily, or how slowly or quickly you move your fabric.

Sounds like a dream come true, right?  I thought so too, when I bought my fancy machine, but I didn't learn to love the stitch regulator and now I never use it.  It seems clunky to me, like keeping the training wheels on your bike even after you've learned to ride it.  I can't sew as fast with the stitch regulator as I can when I'm controlling the machine speed.

I suspect this feature is especially appealing to relatively new quilters because it seems like you can avoid the learning curve of free-motion quilting and be perfect the first time out of the gate.  Kind of like those machines advertised on TV that will allow you to take eight inches off your waistline in a week.  Right.

I would not recommend a stitch regulator, even though I know many quilters who like theirs.  Instead, I recommend you save the money and commit to 12 hours of free-motion practice on a quilt you don't care passionately about.  By that time you will be good enough to work on something you love, especially if you start with a simple design and save the complicated feathers for later.


Monday, May 26, 2014

Quiltmaking 101 -- straight line quilting


Although I use the words "straight line" to describe this method, the lines don't have to be exactly straight.  They can be gently curved, turn corners or make zigzags, but all the while, the feed dogs are pulling the fabric under the needle, so the seams will have uniform stitch length.

But sewing a straight line through a quilt sandwich is a lot trickier than sewing through two pieces of relatively thin material.  The quilt is much thicker, especially if you're using a hefty batt and perhaps a drapery-weight backing or one that has some seams in it.  And because the quilt contains three layers of different materials and characteristics, it's particularly susceptible to creep, where the layers shift under your presser foot.

While the feed dogs are diligently pulling the backing fabric under the needle at their appointed rate, the other two layers may be hanging back.  The presser foot on top of the sandwich is pushing down and making it harder for the quilt top to move smoothly and evenly under the needle, especially at a fat seam.  You can easily find yourself at the end of the quilt with the top hanging a quarter inch or even a half inch behind the backing and batting.

The cure for creep is to pull the sandwich under the needle from the top and bottom at the same time, not just from the bottom.  You accomplish this by taking off the regular presser foot and using a walking foot.  A walking foot doesn't just sit there like a weight on top of the sandwich.  Instead, it has little rubber feet that "step down" onto the fabric, grab it in a tight grip and pull back, then lift up and move forward to grab another stitch worth.

With the rubber feet pulling the top layer and the feed dogs pulling the bottom layer, the whole sandwich comes through in proper alignment.  (If your machine has a built-in "dual feed" or "even feed" feature you may not need a walking foot.)

I love the look of curved machine quilting, but it's only feasible for relatively small quilts.  You have to be able to move the quilt smoothly and easily in one swoop to get smooth and beautiful curves, and that's difficult or impossible to do with a huge quilt sandwich.  Similarly, it's hard to quilt right-angle turns, zigzags or Vs on large quilts, because you have to turn the entire quilt to head in a new direction.

For big quilts, I prefer the simplest possible approach: straight lines that go across the whole width of the quilt.  Sometimes I keep the lines relatively straight, other times I allow them to meander a bit from side to side or even cross one another.  Sometimes I do a second set of lines crossing the first to make a grid.

To quilt straight lines or a grid, first find the approximate center of the quilt, going the shortest way across.  Roll or fold the edges of the quilt into a package like a scroll, exposing only a narrow area at the center, maybe six inches wide.  This way you can maneuver the package through the relatively narrow harp of your sewing machine.  For a very large quilt, I secure the roll with pins, clamps or thread so it doesn't come open as I quilt.

Stitch along the center line from edge to edge.  Flip the quilt over and check the back to make sure you haven't sewed a pleat or wrinkle into the seam.  If it's OK, flip it back and do another line of stitching just to the right of your first line.

Depending on how densely you want to quilt the piece, the second line of stitching can be as close as an eighth-inch or as far as an inch away from the first line.  Add more lines of stitching to the right until you approach the edge of your unrolled area.  Check the back of the work again to make sure there are no pleats or wrinkles, then lay the quilt package flat on a work surface.  Open the right-hand fold or roll to expose a new area, just like unrolling a scroll to read further.  You probably will want to roll up an equal area on the left, to keep the package at about the same size it was to begin with.

Eventually you will have quilted all the way from the center line out to the edge of the quilt.  Now turn the quilt 180 degrees so the unquilted area again extends from the center line out toward the right.  Just as you did with the first half of the quilt, press the quilt, roll or fold to expose a new corridor about six inches wide, stitch to the right of the center line, then again and again until you reach the edge.

If you decide to quilt a second set of lines to make a grid, it will be much easier than the first set.  Since the entire quilt has been secured with stitching, you won't have to press, pin or check the back of your work for pleats and wrinkles.  Just roll or fold the quilt into a scroll and stitch, stitch, stitch.


Thursday, May 22, 2014

Quiltmaking 101 -- quilting your quilt


It isn't a quilt until it's quilted -- that is, the layers (top, batting, backing) are held together with stitching.  You can stitch by hand or machine.

Those who stitch by hand usually put the quilt into a frame of some kind, although you can also work on a flat surface, most likely a table, without a frame.  I have done it both ways, but neither one made me want to master the skill.  That makes me the wrong person to give you advice on hand-quilting, but you can find many books and online tutorials if that's your inclination.

My preferred method -- and that of most quiltmakers today -- is machine quilting, for three reasons.  First, it's so much faster to quilt by machine.  Second, machine quilting is much sturdier (in case you plan to use and wash your quilt).  Third, it gives a more contemporary look.

Nobody can tell you the best way to machine-quilt; she can only tell you the way she quilts.  Perhaps some of the wide variety of quilting techniques arises because different sewing machines have different temperaments and biases.  Your machine may love a certain kind of thread, while the same type on my machine will produce tangles and breakage.  Your machine may have a "dual feed" feature, a stitch regulator or presser foot pressure adjustment, while mine doesn't.  Your machine may have a wider harp than mine, or your sewing table may have a wider flat expanse around and behind the machine for the quilt to rest upon.

We all adjust the way we quilt to compensate for these differences in equipment.  We also learn that some techniques feel comfortable and make us happy, while others don't.  So I won't offer a long tutorial on how I quilt, because it may not work for you.  You'll find the way that is best for you, the best presser foot, the best brand of thread.  Once you've found a way that works, stick with it!  Practice will improve your technique and you'll figure out little adjustments that will make it even better.

I will advise you to try out different techniques on smaller quilts, because they're much easier to handle -- less fabric to fit under the harp, less weight to push and pull around.  And always test your quilting out on a small sample before you work on your actual quilt.  Make the sample from the same materials as the quilt and use the same thread you will use for the quilt.  It's surprising how a slightly different weight or finish of fabric can occasionally require an adjustment in your tried-and-true method.

In subsequent posts I'll describe the two methods of machine quilting: straight-line and free-motion.


Wednesday, May 21, 2014

Quiltmaking 101 -- Sandwiching your quilt


After your quilt top is sewed together, it must be pressed very, very well.  It's almost impossible to do an adequate job of pressing a full quilt top on an ironing board, so find a table or even a floor where you can lay out a padded surface (an old mattress pad is great, or a wool blanket covered with a sheet).  Protect the table or floor if necessary with newspapers or another blanket underneath.

As with pressing individual blocks, start from the back and make sure all the seam allowances are pressed to one side or another -- no flips in between seams, which may be visible in the finished quilt and may hinder your quilting.

See if you can easily fix any flips by opening the seam, pressing in the right direction and sewing the seam closed again.  If you can't, because the bad place is too close to an intersection or is otherwise inaccessible, never mind; it's not the end of the world.

After everything is pointed in the right direction, turn the quilt right side up and press again, getting all the seams nice and flat.  Most important, make sure the top lies perfectly flat.  If it doesn't, figure out where you need to take in a seam or let one out.  If you have a bulge or valley in the top don't tell yourself  "it'll come out in the quilting" because it probably won't.  Fix it now!

If you follow traditional quilting directions, they will tell you to trim the quilt top to a perfect rectangle right now.  You can do this if you want to, but I tend to wait until after quilting to trim.  The fabric often gets a bit (or a lot) distorted because of all the stitching, and why take the time to trim it first only to realize that you have to trim it again?  So you'll notice that the edges of my quilt top in the photos are still kind of raggedy.

Now you can sandwich the top with its backing and batting. First lay out the backing, right side down, and press it well. 

Then put the batting over it, smoothing it out neatly.  (If the batting comes out of the package crumpled up, spritz it with some water and let it tumble in the dryer for a while to get rid of the folds.)

Put the quilt top over the backing and batting.  Leave yourself at least two inches of extra batting and backing beyond the edges of the quilt top; sometimes the layers shift in quilting and you don't want to run out of backing and have to cut off some of your precious piecing!  Press the three layers together.

Inspect the top carefully under the best light you can muster to catch any stray threads peeking up through the seams, or showing through a light-colored fabric, or any other glitches.  I sometimes bring a portable lamp over to the work surface to make sure the shadow of my head from the overhead light doesn't camouflage any bad spots.

Here's a stray thread peeking through the seam.  If you can't pull it free from the top, go to the back, find where it's coming from, and pull it to the back.

Here's the back view of a seam where light and dark colors abut and the seam allowances were pressed toward the light.  Note how the dark seam allowance was kept narrower than the light, to minimize the chances of see-through. Nevertheless, those stray threads raveling off the dark fabric will be visible from the top of the quilt.  Get a tiny scissors and clip them off.

When you're sure the quilt looks perfect, press it again.  Pressing helps meld the layers together and keep the quilt sandwich in place.  But pressing probably won't be enough to keep the three layers of the quilt sandwich properly aligned while you sew them together.

Quilting is a rough, tough process.  You have to manhandle your quilt and move it around a lot.  You have to force a relatively large volume of fabric under the relatively small harp of your sewing machine, by rolling, folding or wadding it to fit.  If you're not careful, the three layers can get out of whack, as one or more stretches a bit or warps on the diagonal or wraps farther around a fold then the other layers do.  As a result, you can get pleats or wrinkles on the top or bottom of the sandwich.

To prevent this shifting, quilters generally use some method of temporarily holding the layers together until they're permanently attached with the quilting stitches.  This can be done in three ways, each with its drawbacks:

You can baste the layers together with thread, in large stitches.  Drawbacks: Basting takes a lot of time, and it can be messy to remove the thread afterwards if you have sewed through it.

You can pin the layers together, either with safety pins or straight pins.  Drawbacks: Safety pins take longer to insert and remove, and that process is hard on your hands.  Straight pins can scratch and impale you while you're working.  With either type of pin you must remove each one just before you sew over it, lest you break your needle.  Quilters who like to pin sometimes do it in stages, pinning only a small area of the quilt to begin with; then after they've quilted that area, they lay the quilt flat, press it again and pin a new area.

You can glue the layers together, with a spray adhesive or a thin layer of heat-set glue (aka fusible web or fusible batting).  Drawbacks: The sprays can make a mess on your work surface and perhaps create a health hazard (you may want to wear a mask or respirator).  Any type of adhesive or fusible is expensive.


Monday, May 19, 2014

Quiltmaking 101 -- the quilt production line


When all your blocks are finished, pressed and trimmed, it's best to have a system for sewing them together, to make it less likely that you'll get confused and sew them in the wrong order or put one upside-down.  Here's an efficient method that allows you to put the entire quilt top together at only two sewing machine sit-downs.

After the blocks are arranged on the design wall in the order you like, take a good look at your design and picture the blocks in numbered vertical columns, starting with column 1 on the left side.  You might want to take a photo of this arrangement to consult if you get confused (especially recommended if breezes blow through your studio, if pets or children visit, or gremlins have been known to drop in while you're in the bathroom).

Now, move the blocks from the wall to a big cutting board or piece of foamcore, arranging them in columns, starting with the bottom block of the right-hand column.  The next block up from the bottom slightly overlaps the bottom one, and finally the top block of the column is the top block of the pile.  Place this pile at the right-hand side of your board.

Transfer each column of blocks in the same manner, slightly overlapping piles if necessary to fit them on your board.  For a very large quilt, take down several columns from the right side first, sew them together, and then take down the rest of the columns and sew them.

Carry the board carefully to your sewing machine and place it somewhere that you can reach without getting up from your chair.

Begin with columns 1 and 2, the two left-hand columns of the quilt, and the two left-hand piles on your board. Take those two piles off your board and place them near the sewing machine.

Pick up the top block from column 2, flip it right side down onto the top block from column 1 and sew the blocks together down the right side of the pair.

When you reach the end of the block, don't cut the thread; just keep stitching onto the next pair of blocks, which are the next two blocks on the piles.  Keep going until you have sewed all the blocks in column 1 to their next-door neighbors in column 2.

You now have a long chain of pairs of blocks, looking like a series of closed books.  The blocks from column 1 are on the bottom, and those from column 2 are on top (right side down).

When you get to the last pair of blocks, you can cut the thread at the machine, but leave the chains of stitching between the pairs of blocks.  Go back up to the top of your chain, to the two top blocks in the columns, and open the "book" so you're looking at the right sides of the fabric.  The block from column 1 is the left-hand "page," and the block from column 2 is the right-hand "page."

Get the column 3 pile from your board and place it by the machine. Pick up the top block from column 3, flip it right-side down over the top block from column 2, and sew.  Just as you did on the first line of stitching, don't cut your thread between blocks, just sew from the first pair onto the next pair.  When you get to the end of this column, your chain is just as long as it was before, but it's three blocks wide instead of two.

Repeat this process, one column at a time, until you've sewed all the blocks together.  Notice that it's impossible for any blocks to get out of order, once they're sewed, because they're all held in their proper place by the thread chains between the blocks.


After all the columns are sewed, press the seams.  Make sure you don't cut the threads while you're pressing, so all the blocks stay in the right order.

Return to the sewing machine and turn the quilt a quarter-turn so the sewed-together horizontal rows of blocks become sewed-together vertical columns.  Now you have a series of strips running vertically, joined delicately but firmly to their neighbors with a bunch of thread chains.  Arrange them on your work surface with the right side facing up.

This time, start at the right.  Flip the right-hand strip back toward the left, closing the book by folding along the line of threads.  Align the edges and stitch.  You may want to pin the seam together at each block intersection if it's quite long or if you really want the corners to match.

Next sew the third strip to the second, and the fourth strip to the third, and so on until everything is in one piece.  One more session of ironing, and you're done.

On most quilts I don't much care if the corners of the blocks match exactly.  Often fabrics are similar in color or value and you can hardly notice where the corners fall, especially on print fabrics.  But if you want your corners to line up perfectly, put pins exactly through the seams.

As you start stitching across the first pair of blocks, hold the pin at the end of that block and pull the fabric taut.  Even if the two blocks aren't exactly the same length, the shorter one will ease a bit to match the longer one.  It's important that you establish this slight tension as early as possible: an eighth-inch of extra fabric will stretch better across a 6-inch expanse than if you wait till the last inch to ease it in.

Remove the first pin one stitch before the needle hits it, sew carefully across the seam intersection, then shift your grasp to grab the second pin and repeat the process across the second pair of blocks.


Friday, May 16, 2014

Thursday, May 15, 2014

Quiltmaking 101 -- trimming your blocks to size


After you've sewed all your blocks and pressed them meticulously, it's time to trim them to size so you can easily assemble your quilt.  The best way is with a plastic square ruler; I'm assuming your ruler is larger than your block (although the easiest of all is to trim your blocks to exactly the same size as your plastic square; I have learned to love 6-inch blocks that finish to 5 1/2 inches square).

Hold your ruler so the zero measurement on each side falls at the top right corner (lefties stage up at the top left).  The ruler will have a diagonal line on it heading down and out from that corner.  Follow along that line to the size you want your block to be, and mark the spot with a grease pencil or a bit of blue painter's tape.

Put a block on your cutting mat. Place your square over the block, just as close to the top and right edges as you can.

If it's important to you that the interior seams of the block should be exactly at right angles, or at a certain distance in from the edge, you can align them with one of the gridlines on the ruler.

Now slice off the top and right margins.  Perhaps you will barely take off a thread or two, but it's important to start with a perfectly square corner.

Next, flip the block around so the perfectly square corner is at bottom left.

Position your square ruler over the block so the marked spot is exactly on the bottom left corner of your block, and the gridlines are exactly on the cut edges of the block.  Slice off the top and right edges.


If you want your blocks to be rectangular instead of square, put your painter's tape or grease pencil mark at the right place on your plastic ruler and then use the same method to align the bottom left corner of your block with the mark.

You will notice that my original block was larger than the finished size, leaving a bit to cut off.  The quilt police would tell you that if you want an eight-inch block, you should start with a bunch of eight-inch-long strips and carefully sew them together.  I say you should start with 8 1/4" strips, or maybe even 8 1/2" if you're going to be doing tricky piecing, and then trim the block to size after it's all sewed and pressed. 

No matter how carefully you sew, things happen and your exactly eight-inch strips may get staggered out of position and leave you with a block that's a bit wonky or too small.  That is frustrating.  Better to start with a bit of extra fabric, sew with less fussiness (and more speed) and make things perfect at the end. 

Tuesday, May 13, 2014

Truth in advertising


I know that when you make "yarn" from leftover textiles you neither expect nor want to have perfect color matches from skein to skein.  But these don't even look close:

Probably best to choose a project requiring one skein.